Practice Data Entry
The first screen that presents for data entry is the Demographic information.
Enter data requested and Save.
|
Field |
Description |
Example |
|---|---|---|
|
Practice Name * |
Name of the practice |
Kaibigan Clinic |
|
Practice TypeID * |
Type of |
Group Practice |
|
Legal Name |
Legal name for the practice |
Kaibigan Clinic LLC |
|
NPI |
National Provider Identifier record for the practice |
1245840081 |
|
TaxIDNumber Practice |
Tax ID for the practice |
75-1124948 |
|
BillingPayableToName Practice |
The Billing Payable name for the practice |
Kaibigan Clinic |
|
Website * |
The website for the Practice |
http://www.kaibigan.clinic |
|
Notes |
Notes |
|
|
ElectronicBillingCapability |
This checkbox denotes if the practice can perform electronic billing |
☒ |
Fields noted with a red asterisk (*) are required.
Location Data is also required for Practices.
|
Field |
Description |
Example |
|---|---|---|
|
Location ID * |
Practice ID |
123456789 |
|
Address |
Physical address of the practice |
555 Mariposa Avenue |
|
Legal Name |
Legal name of the practice |
Kaibigan Clinic |
|
NPI |
National Provider Identifier record for the practice |
123456789 |
|
Tax ID Number |
Tax ID for the practice location |
75-123456 |
|
Location Type ID * |
Location type ID |
Main Location |
|
Date From |
Location start date |
01/01/2015 |
|
Date to |
Location ending date |
06/01/2025 |
|
Office Manager Name |
Office manager of practice location |
Jun Inocencio |
|
Website |
Website of practice location |
http://www.kaibigan.clinic |
|
24 Hour Coverage |
Denotes if the Practice location offers 24 hour coverage |
☐ |
|
Notes |
Notes regarding the Practice location |
Located in Garland Medical Suites |
Fields noted with an asterisk (*) are required.
Once the Demographics and Location data is saved additional menus will become available for entry. Menus with an arrow next to the name have additional sub menus for data entry.
Screen-level Data Entry
All additional data entry panels function in the same manner.
To create a new row of data:
-
Click the Create New button to open the data entry panel
-
Enter data ensuring all required fields are populated.
-
Save
If additional new data is needed for the same panel, repeat the steps above.
If edits are needed to the existing data clicking on the data hyperlink will open that panel for editing.
Navigate through the menu items and complete all applicable data entry.
Images
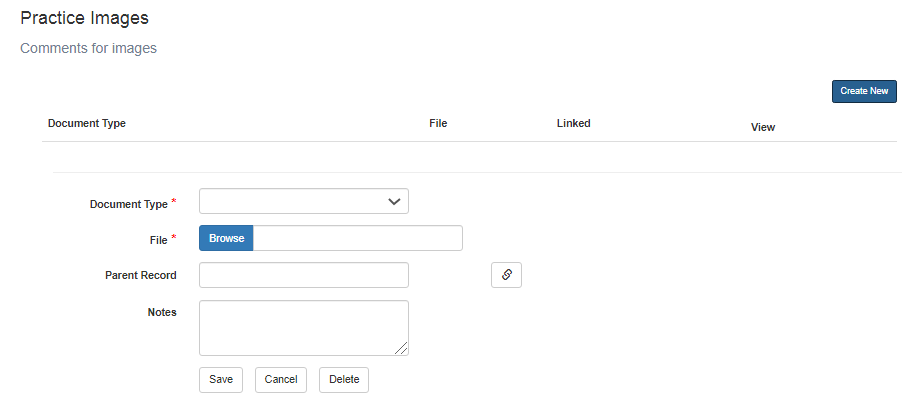
The Images panel functions similarly to other data entry panels.
-
Click the Create New button to open the data entry panel.
-
Select the appropriate value from the Document Type dropdown field.
-
Use the Browse button to navigate to the Image file you are uploading and select Open.
-
(Optional) To link the image to a record, click the link icon and select the appropriate record.
-
Save.
If additional images need to be uploaded repeat the steps above.
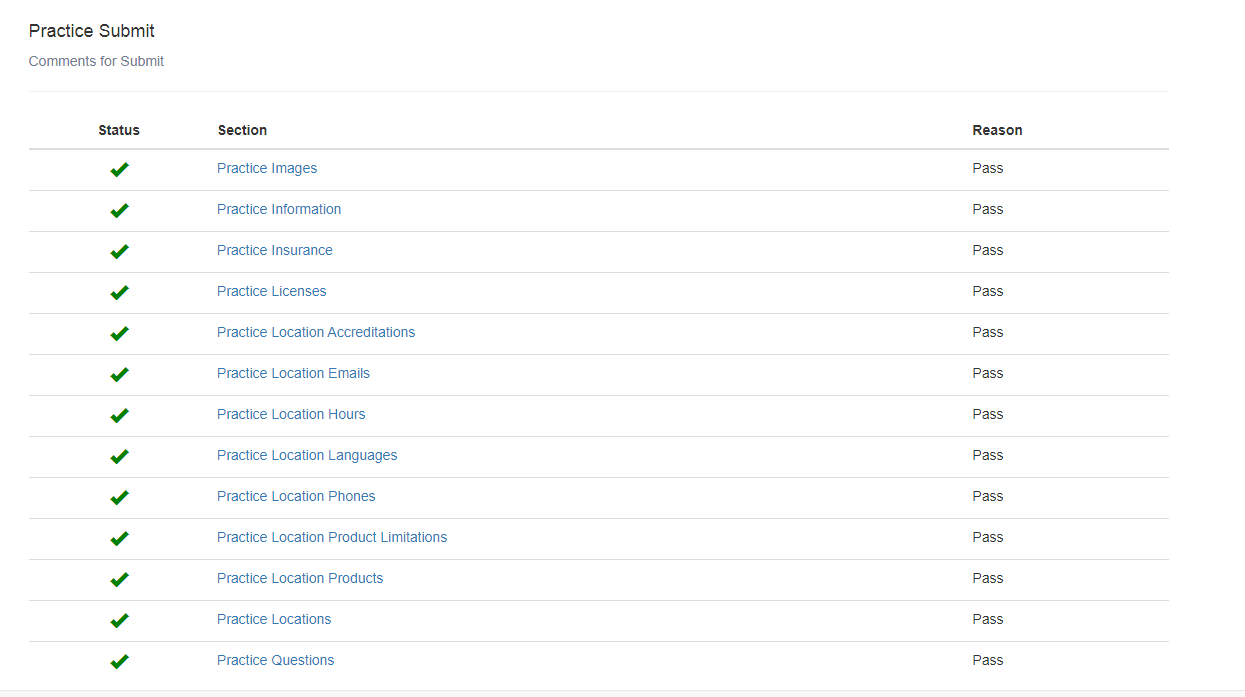
Once all necessary data and images have been entered and uploaded select the Submit button and you should see all required panels with a green check mark.
Users can enter data and add images or documents in multiple sessions if necessary. All updates are saved in between user sign on sessions. Users can return to their application and update as necessary prior to final submission.
If any sections have been omitted, you will see a red X and this data must be completed before submission can occur. Click Submitting the Application, above, to return to the page to complete the missing information.
The following example shows an application that is ready to be submitted.

Once the application has been successfully submitted you will receive this message and have an opportunity to download a PDF copy of your submitted application data.
The sponsoring organization will be notified of your submission for processing.


